

Saturday, December 28, 2013
Thursday, September 26, 2013
The Library
Instead of boxes and boxes of books (OK and boxes and boxes), there is now a library!! I follow the DIY sites and had settled last year on the Billy bookcases from IKEA. Three of the 30-1/2" width ones, including their height extension units, would take up the space from side to side and up to the ceiling of what the realtor had called the master bedroom sitting room. It was a room between the hallway from the kitchen and the master bedroom. We couldn't figure quite what to do with a "sitting room". The previous owners had used it as a dressing area, sort of.
.jpg)
We didn't need that. All the bedroom furniture fit into the bedroom. So a dressing area, no. Another area to sit in, not particularly. But a place to put all these books and recycle the boxes? Now that's a room I could understand and appreciate and be grateful for. So I measured and measured and figured out exactly what to order from IKEA. After the bookcases came and we put them together, then there would be more parts to go get from Yadkin Lumber Company for the base molding, toe molding, and crown molding, probably even some more little pieces from them in order to make the bookcases look like they are built-in and have always been there. There are plenty of DIY sites with step-by-step directions on how to do this. The most helpful, I think, is Centsational Girls's, but there are lots of others for specific installations. Hers matched what we wanted to do. Here's hers:

© 2009-2013 Centsational Girl, all rights reserved.
Except that we wanted to go all the way to the ceiling, a very possible task since the ceiling is 8 feet and the Billy bookcases plus height extension units are less than 3" from the ceiling, so with the crown molding, it'd be perfect. Ok, so I had my list of what to order from IKEA, filled out their shopping list, then shopping cart, then got ready for the payment part, and whoa PROBLEM. Stopped me right in my tracks. The shipping to Yadkin was $249.00.
The closest IKEA store is in Charlotte NC, but I looked up the dimensions of the packages (they tell you right on their website, isn't that nice?) and first of all, they wouldn't fit in our vehicles, and second of all, we just flat weren't going to be able to lift up those packages, each 87 pounds (they tell you that too), onto a shopping cart, from the cart to the car, and from the car to the house and on back to the "sitting room". Both of us have serious back issues. So that's where the whole process stayed for several months -- stalled. Friends offered to go with me to the Charlotte store and help, but nothing seemed to actually pan out for various reasons. The boxes remained on the floor.
Then the FreeCycle program started things off. If you haven't explored your local FreeCycle program, you really should. It's wonderful. A bunch of people trying to keep things out of the landfills. So they offer things through the FreeCycle network to other people who are also offering their things. Somehow it all works out. I have been on both the offering and receiving end of FreeCycle and have had really good experiences with the people. The website is freecycle.org and then you look for the group closest to you.
But back to the bookcases. Someone was moving within a couple of days and had to clear out their house. So they were offering several items on FreeCycle as long as you picked them up right away. One of their postings was for two white bookcases. Bingo! So my sister said she'd help me pick them up. They were down at the other end of her street. The offering people had left the bookcases on their front porch. So we got them into the truck, tied them down, and got them back to my house. Even though "we" was mostly her, she still needed me and so boy was I sore the next day! But I digress....
They were both in great shape. One was perfect for the area off the kitchen. The other one turned out to be an IKEA Billy bookcase! How serendipitous! Exactly what I had been wanting. Since it was already all put together, all we had to do was to anchor it to the wall.

And order the height extension unit to bring it up to the ceiling -- IKEA delivered that for only $11.00. Here it is after putting it together (very easy to do):

Well this was even more of a confirmation that my original plan for 3 Billys was the thing to do for the sitting room. And for the boxes of books. So God bless two friends of mine for making this happen! They came and got me and we went to the Charlotte IKEA store. IKEA has on their website the row and bin# of the items in the self-serve section (which these are) at their store as well as a layout map of the inside. This is just tremendously helpful, saves so much time, no wandering around. We were all very impressed with IKEA that day.
My friends loaded up the remaining two Billys and height extension units and when they rang it all up, I still had $ on my gift card! So yes, this was meant to be. Back home with it all, they hauled the packages into the sitting-room-about-to-be-library. They intended to stay and put it all together, but we were all pretty beat by then, and I felt like I had already taken up way too much of their day, and that we could take it from here. I thought I could actually work on putting them together here and there. Farmer Lynn thought he could put them together maybe the next day. Well, I'll bet you can guess how that all came out. So here's the three heightened bookcases put together and each anchored to the wall.

Here's a little more progress on the unpacking. You may be able to see the little folded index cards I had to put on the shelves while I was putting the books away. Those are to help me organize the books into categories (Poetry, Science Fiction, Art, Bibles, Famous People, ...) so I could quickly find the right section.

And here are the loaded-up bookcases:

Two little accessories finished it up. While at IKEA, we had also gotten this little BEKVÄM step stool to be able to reach the top shelves. It turned out to be a remarkably sturdy step stool as well as a just-big-enough-just-small-enough side table! And then the other day at Salem Creek, a local store here, I bought this little white wooden lamp with a white burlap shade. The whole thing is the perfect size to fit in between the bookcase shelves! I may go back and get another one of these.


All of those book boxes are empty, broken down, and about half already to the recycle station. My sister came and helped me get the books all into the bookcases. It was amazing that all of those books went into the bookcases and there are no more boxes and no more empty shelves. It came out perfectly. The "sitting room" that we didn't know what to do with became the library that is useful and helpful and looks very nice. I'm very happy with this project.

There are still a few finishing steps. In order to make the bookcases look built-in like Centsational Girl's does, we still need a trip to the lumber store to get a 94-1/2" strip of "classic baseboard" to go across the bottom front. There is no baseboard in the rest of the room but the bottom fronts need to have painted white baseboard to look better and also to get ready for the quarter-round toe/shoe moulding. The room does have stained toe/shoe moulding as well as simple white crown moulding, so those two types will have to come around both sides and across the front. Roughly 116" of each but will get more because of the mitered corners. I'll post that part when we get back to it. We have a few have-to-be-done projects first in order to get the Yadkin Yard and house ready for winter. I think the mouldings will be pretty simple actually but that remains to be seen. For now, I'm OK basking in my new library! Yay! Thank you to everybody who helped.
.jpg)
We didn't need that. All the bedroom furniture fit into the bedroom. So a dressing area, no. Another area to sit in, not particularly. But a place to put all these books and recycle the boxes? Now that's a room I could understand and appreciate and be grateful for. So I measured and measured and figured out exactly what to order from IKEA. After the bookcases came and we put them together, then there would be more parts to go get from Yadkin Lumber Company for the base molding, toe molding, and crown molding, probably even some more little pieces from them in order to make the bookcases look like they are built-in and have always been there. There are plenty of DIY sites with step-by-step directions on how to do this. The most helpful, I think, is Centsational Girls's, but there are lots of others for specific installations. Hers matched what we wanted to do. Here's hers:
© 2009-2013 Centsational Girl, all rights reserved.
Except that we wanted to go all the way to the ceiling, a very possible task since the ceiling is 8 feet and the Billy bookcases plus height extension units are less than 3" from the ceiling, so with the crown molding, it'd be perfect. Ok, so I had my list of what to order from IKEA, filled out their shopping list, then shopping cart, then got ready for the payment part, and whoa PROBLEM. Stopped me right in my tracks. The shipping to Yadkin was $249.00.
The closest IKEA store is in Charlotte NC, but I looked up the dimensions of the packages (they tell you right on their website, isn't that nice?) and first of all, they wouldn't fit in our vehicles, and second of all, we just flat weren't going to be able to lift up those packages, each 87 pounds (they tell you that too), onto a shopping cart, from the cart to the car, and from the car to the house and on back to the "sitting room". Both of us have serious back issues. So that's where the whole process stayed for several months -- stalled. Friends offered to go with me to the Charlotte store and help, but nothing seemed to actually pan out for various reasons. The boxes remained on the floor.
Then the FreeCycle program started things off. If you haven't explored your local FreeCycle program, you really should. It's wonderful. A bunch of people trying to keep things out of the landfills. So they offer things through the FreeCycle network to other people who are also offering their things. Somehow it all works out. I have been on both the offering and receiving end of FreeCycle and have had really good experiences with the people. The website is freecycle.org and then you look for the group closest to you.
But back to the bookcases. Someone was moving within a couple of days and had to clear out their house. So they were offering several items on FreeCycle as long as you picked them up right away. One of their postings was for two white bookcases. Bingo! So my sister said she'd help me pick them up. They were down at the other end of her street. The offering people had left the bookcases on their front porch. So we got them into the truck, tied them down, and got them back to my house. Even though "we" was mostly her, she still needed me and so boy was I sore the next day! But I digress....
They were both in great shape. One was perfect for the area off the kitchen. The other one turned out to be an IKEA Billy bookcase! How serendipitous! Exactly what I had been wanting. Since it was already all put together, all we had to do was to anchor it to the wall.

Well this was even more of a confirmation that my original plan for 3 Billys was the thing to do for the sitting room. And for the boxes of books. So God bless two friends of mine for making this happen! They came and got me and we went to the Charlotte IKEA store. IKEA has on their website the row and bin# of the items in the self-serve section (which these are) at their store as well as a layout map of the inside. This is just tremendously helpful, saves so much time, no wandering around. We were all very impressed with IKEA that day.
My friends loaded up the remaining two Billys and height extension units and when they rang it all up, I still had $ on my gift card! So yes, this was meant to be. Back home with it all, they hauled the packages into the sitting-room-about-to-be-library. They intended to stay and put it all together, but we were all pretty beat by then, and I felt like I had already taken up way too much of their day, and that we could take it from here. I thought I could actually work on putting them together here and there. Farmer Lynn thought he could put them together maybe the next day. Well, I'll bet you can guess how that all came out. So here's the three heightened bookcases put together and each anchored to the wall.
Here's a little more progress on the unpacking. You may be able to see the little folded index cards I had to put on the shelves while I was putting the books away. Those are to help me organize the books into categories (Poetry, Science Fiction, Art, Bibles, Famous People, ...) so I could quickly find the right section.
And here are the loaded-up bookcases:

Two little accessories finished it up. While at IKEA, we had also gotten this little BEKVÄM step stool to be able to reach the top shelves. It turned out to be a remarkably sturdy step stool as well as a just-big-enough-just-small-enough side table! And then the other day at Salem Creek, a local store here, I bought this little white wooden lamp with a white burlap shade. The whole thing is the perfect size to fit in between the bookcase shelves! I may go back and get another one of these.


All of those book boxes are empty, broken down, and about half already to the recycle station. My sister came and helped me get the books all into the bookcases. It was amazing that all of those books went into the bookcases and there are no more boxes and no more empty shelves. It came out perfectly. The "sitting room" that we didn't know what to do with became the library that is useful and helpful and looks very nice. I'm very happy with this project.

There are still a few finishing steps. In order to make the bookcases look built-in like Centsational Girl's does, we still need a trip to the lumber store to get a 94-1/2" strip of "classic baseboard" to go across the bottom front. There is no baseboard in the rest of the room but the bottom fronts need to have painted white baseboard to look better and also to get ready for the quarter-round toe/shoe moulding. The room does have stained toe/shoe moulding as well as simple white crown moulding, so those two types will have to come around both sides and across the front. Roughly 116" of each but will get more because of the mitered corners. I'll post that part when we get back to it. We have a few have-to-be-done projects first in order to get the Yadkin Yard and house ready for winter. I think the mouldings will be pretty simple actually but that remains to be seen. For now, I'm OK basking in my new library! Yay! Thank you to everybody who helped.
Monday, July 15, 2013
What Lurks Inside A Lady Banks Rose? Why, a TV Dish of course!
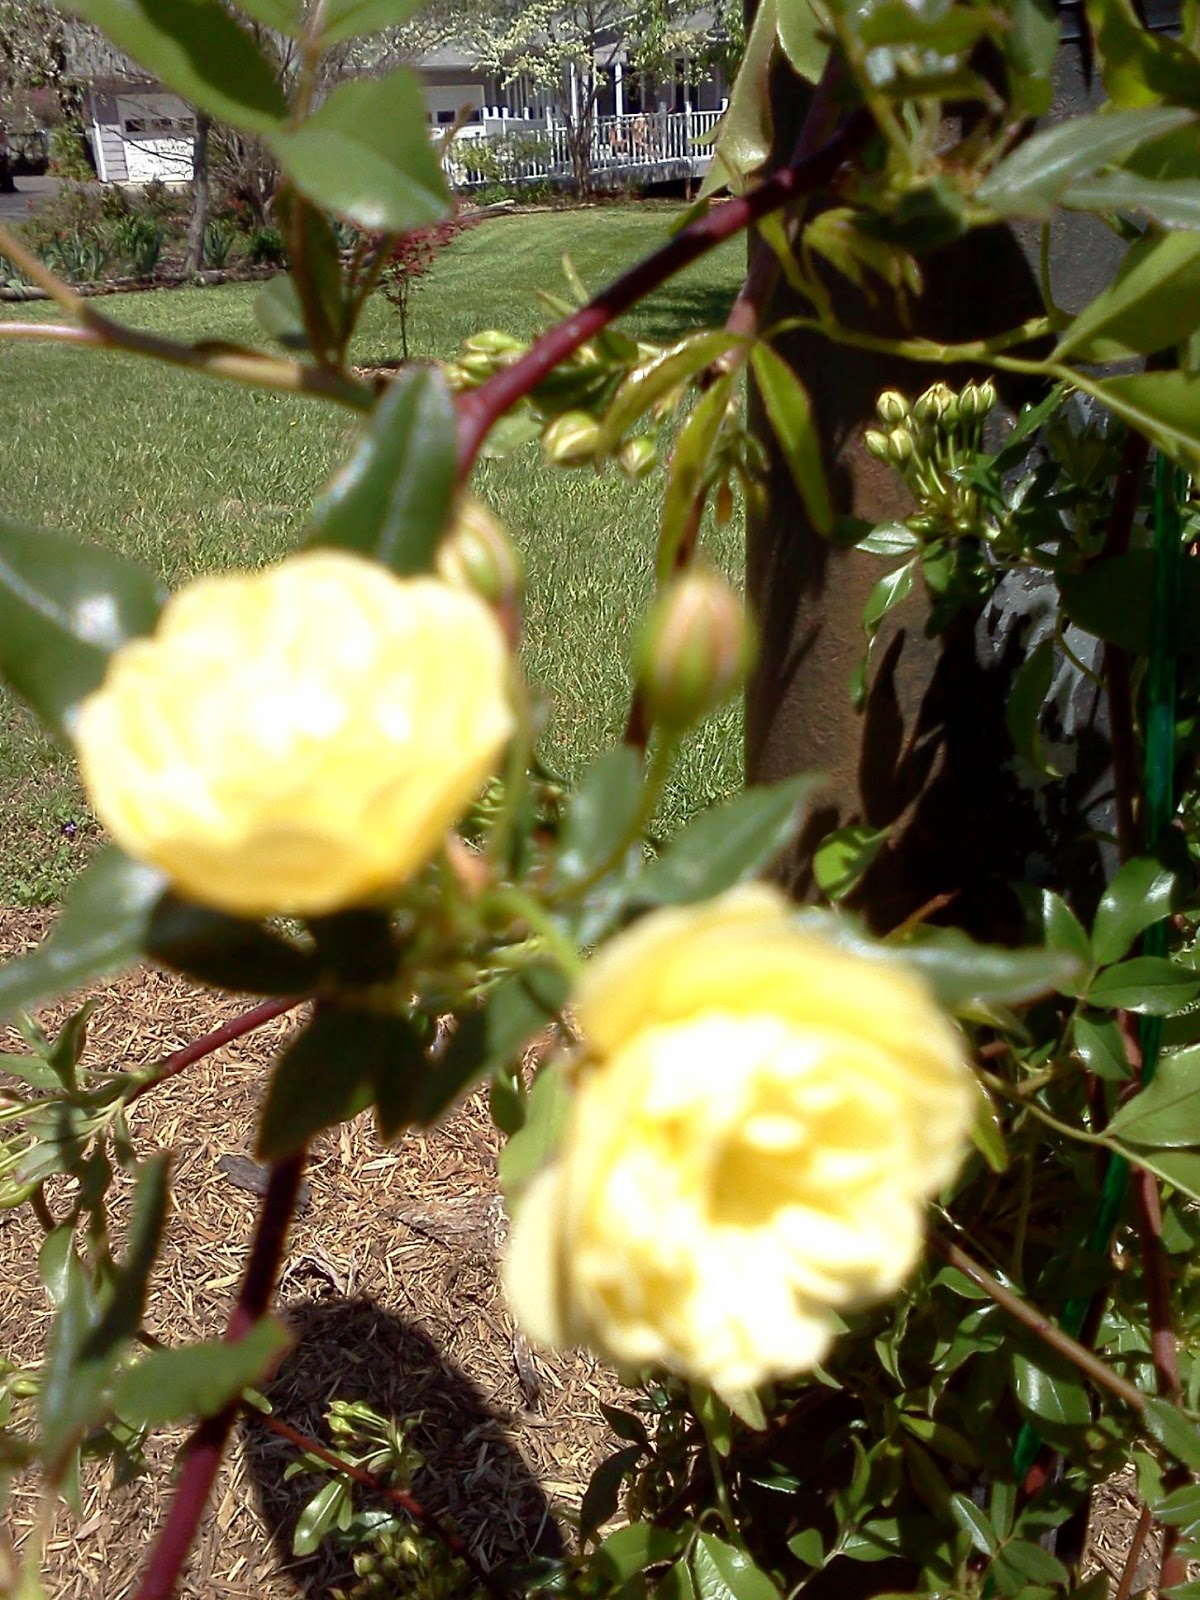
In the Yadkin Yard, there is a Dish that is no longer connected all the way to the house, but is firmly planted in its spot in the side yard. It wasn't coming down/out nicely, definitely not. Once that was established, and the decision was made to "hide" it instead, we knew immediately exactly which plant we were going to use for that. Hello Lady Banks! Rosa banksiae 'Lutea', the Lady Banks rose, no question. This is a thornless rose, a distinct advantage when you're planning to train its growth habit. It comes in white and in yellow, the yellow being much more prevalent. It blooms once a year in the early spring, clusters of little double blooms all over the plant. Quite a show. We chose a yellow one.

As I said, the Lady Banks is a rose bush without thorns. Abraham Lincoln said “We can complain because rose bushes have thorns, or rejoice because thorn bushes have roses.” A very good point. And yet it's very pleasant to find a rose bush with no thorns! I have had several in the past, at previous houses, at my mother's, and currently at my daughter's house. It has only a slight fragrance if any at all.
The Yadkin Yard is in zone 7a but I initially encountered this rose in Savannah, Georgia, zone 8b. It is referred to as a "vine", which is how we're going to use it, at least to start off, but I think that's deceiving because it's perfectly capable, if not given any support, of growing numerous shoots from the ground and being its own showy separate plant. It wouldn't at that point be a vine along the ground, for example. It's going to shoot up and out. But it does take to having some support quite well. The Dish was just that sort of fine support system. I see it also referred to as a "rambler" or "climber". I would be more comfortable with those descriptions than calling it a "vine". The Lady Banks is not susceptible to the diseases that plague other types of roses. It is all-in-all a very satisfying plant.
Fairly soon after initially planting the new Lady Banks at the foot of the Dish, we noticed it was apparently quite tasty to the neighborhood rabbits. Farmer Lynn quickly encircled it in chicken wire and that was the end of that.
Here it is in mid-November 2012, planted, rabbit-nibbled, and then starting over again to grow, this time with netting around it at rabbit level --

That first year, it established itself, overcame the rabbit munching, and began its climb up the Dish post. I felt the need to train it around the post that first year so that it would go up up up and not fall onto the ground where it could be rabbit food again.
Being an evergreen plant, it still does and will cover its support year-round. This past winter was particularly mild and short, so the Lady Banks had extra Fall and Spring growing time. I am still "training" it around the back of the Dish, but I think that's just me and wouldn't actually be necessary at all.
Here it is mid-April 2013. It had already made it up the post and onto the Dish itself.


Beautiful!!

and now in mid-June 2013, it's bush-ing out quite a bit. I don't know that it'll complete its coverage journey this year, but my daughter is still convinced that it will. If not this year, then definitely next.


My daughter is in zone 7b and her Lady Banks is huge. They've cut it back mercilessly several times and it's still huge. It anchors a corner within their backyard fence and spills over the fence with gusto. And look at these blossoms!

That picture from 2012 wasn't even as big as that rose bush has gotten there. In fact, it is currently quite a bit larger than that. Here it is from 2010 from inside the fence. See, it doesn't need a structure to grow on. It's its own little rose bush shrub here --

The corresponding plant on the other corner is a Loropetalum, a purple shrub that is also huge. There are a few different types of Loropetalums, including at least one "pixie" variety and one that's not purple, but theirs is the type that is most prevalent and clearly is happy to be in their zone 7b. The two huge plants flanking the far corners of the yard do not seem to be aware that they were designed to stay within the confines of the backyard fence, which is actually a particularly tall fence. Zone 7b must be their perfect location.
Now that Summer is here, the Lady Banks has clearly taken off. It is a very aggressive climber, in this case that's a good thing. She'll make it over and around the Dish this year. We may still be able to see parts of the black support but next year will take care of that also. With one more year's growth, in full bloom, it'll be stunning. And bye-bye, Mister Dish.
As I said, the Lady Banks is a rose bush without thorns. Abraham Lincoln said “We can complain because rose bushes have thorns, or rejoice because thorn bushes have roses.” A very good point. And yet it's very pleasant to find a rose bush with no thorns! I have had several in the past, at previous houses, at my mother's, and currently at my daughter's house. It has only a slight fragrance if any at all.
The Yadkin Yard is in zone 7a but I initially encountered this rose in Savannah, Georgia, zone 8b. It is referred to as a "vine", which is how we're going to use it, at least to start off, but I think that's deceiving because it's perfectly capable, if not given any support, of growing numerous shoots from the ground and being its own showy separate plant. It wouldn't at that point be a vine along the ground, for example. It's going to shoot up and out. But it does take to having some support quite well. The Dish was just that sort of fine support system. I see it also referred to as a "rambler" or "climber". I would be more comfortable with those descriptions than calling it a "vine". The Lady Banks is not susceptible to the diseases that plague other types of roses. It is all-in-all a very satisfying plant.
Fairly soon after initially planting the new Lady Banks at the foot of the Dish, we noticed it was apparently quite tasty to the neighborhood rabbits. Farmer Lynn quickly encircled it in chicken wire and that was the end of that.
Here it is in mid-November 2012, planted, rabbit-nibbled, and then starting over again to grow, this time with netting around it at rabbit level --

That first year, it established itself, overcame the rabbit munching, and began its climb up the Dish post. I felt the need to train it around the post that first year so that it would go up up up and not fall onto the ground where it could be rabbit food again.
Being an evergreen plant, it still does and will cover its support year-round. This past winter was particularly mild and short, so the Lady Banks had extra Fall and Spring growing time. I am still "training" it around the back of the Dish, but I think that's just me and wouldn't actually be necessary at all.
Here it is mid-April 2013. It had already made it up the post and onto the Dish itself.


Just 3 days later, still in April 2013 --


And four days after that, it's blooming!


and now in mid-June 2013, it's bush-ing out quite a bit. I don't know that it'll complete its coverage journey this year, but my daughter is still convinced that it will. If not this year, then definitely next.


My daughter is in zone 7b and her Lady Banks is huge. They've cut it back mercilessly several times and it's still huge. It anchors a corner within their backyard fence and spills over the fence with gusto. And look at these blossoms!

The corresponding plant on the other corner is a Loropetalum, a purple shrub that is also huge. There are a few different types of Loropetalums, including at least one "pixie" variety and one that's not purple, but theirs is the type that is most prevalent and clearly is happy to be in their zone 7b. The two huge plants flanking the far corners of the yard do not seem to be aware that they were designed to stay within the confines of the backyard fence, which is actually a particularly tall fence. Zone 7b must be their perfect location.
Now that Summer is here, the Lady Banks has clearly taken off. It is a very aggressive climber, in this case that's a good thing. She'll make it over and around the Dish this year. We may still be able to see parts of the black support but next year will take care of that also. With one more year's growth, in full bloom, it'll be stunning. And bye-bye, Mister Dish.
Thursday, July 4, 2013
Yadkin Yard in Spring 2013
Wow, the Yard really showed off this Spring. Here are the blooms on the old peach tree. It blooms really gorgeous, did last year too, a dark pink all over the tree.
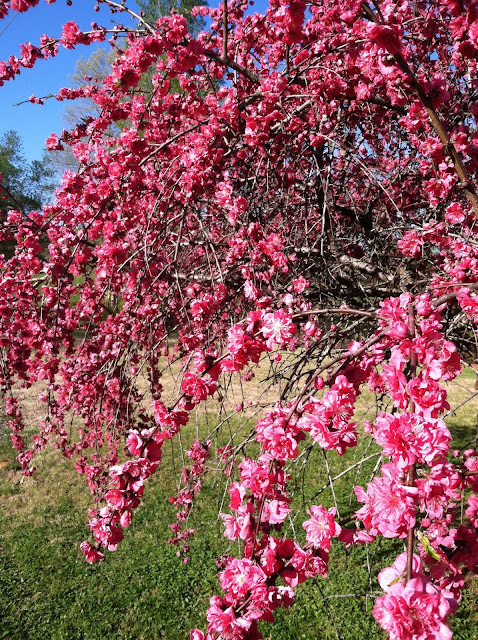
.JPG) Sadly the peaches, though plentiful were only about
the size of a half dollar. Farmer Lynn pruned the "old guy" back last spring, and again this spring.
Sadly the peaches, though plentiful were only about
the size of a half dollar. Farmer Lynn pruned the "old guy" back last spring, and again this spring.
 Next years peaches will come from the new growth of last year's pruning so we will see if the tree is past its prime and more ornamental now.
Other show-offs
 A Redbud

This is the fancy Weeping Laceleaf Japanese Red Maple. It stays low to the ground. I didn't think I liked it at first but I really do now. It's a pretty little tree. There are actually several varieties of Maples out here. A Bloodgood Japanese Maple brought from my mother's yard, regular red Maples and green Maples that were already here, this fancy one, and Farmer Lynn has bonsai'd either one or two downstairs.

The adolescent Bloodgood from my mother's yard and one of the bonsai'd ones:


Here's one of the beautiful Encore Azaleas Farmer Lynn brought from the city, just beginning to bloom. There are several azalea colors -- this pretty creamy purple, red, dark pink.... The previous owner clearly loved azaleas and they're so pretty this time of year. There are a few Rhododendrons also, in the south border. I didn't notice what color they were last year and they haven't bloomed yet.


Beautiful iris, one of several that are a dark purple on the bottom and golden on the top. Gorgeous. Farmer Lynn had carried these around with him in pots for several years. They finally got back into ground and showed their appreciation for that --

This is tradescantia. This variety has regular green foliage and purple and blue flowers. I have the 'Sweet Kate' variety that I want to transplant from the condo over here and put just to the right of these. 'Sweet Kate' has bright lime foliage and will add nicely to this grouping.

and beautiful daylilies also --


The Yadkin Yard has been a very happy yard this Spring. We look forward to the Summer now and the garden.


Yes, this is the same peach tree Farmer Lynn put crutches on once last year before the peaches came.
.JPG)

Other show-offs


This is the fancy Weeping Laceleaf Japanese Red Maple. It stays low to the ground. I didn't think I liked it at first but I really do now. It's a pretty little tree. There are actually several varieties of Maples out here. A Bloodgood Japanese Maple brought from my mother's yard, regular red Maples and green Maples that were already here, this fancy one, and Farmer Lynn has bonsai'd either one or two downstairs.

The adolescent Bloodgood from my mother's yard and one of the bonsai'd ones:


Beautiful iris, one of several that are a dark purple on the bottom and golden on the top. Gorgeous. Farmer Lynn had carried these around with him in pots for several years. They finally got back into ground and showed their appreciation for that --

This is tradescantia. This variety has regular green foliage and purple and blue flowers. I have the 'Sweet Kate' variety that I want to transplant from the condo over here and put just to the right of these. 'Sweet Kate' has bright lime foliage and will add nicely to this grouping.

and beautiful daylilies also --


The Yadkin Yard has been a very happy yard this Spring. We look forward to the Summer now and the garden.

Tuesday, June 18, 2013
Beautiful Bird Nests Made From Gourds

He sands the gourds smooth by hand with a medium sandpaper. Then he cuts a hole in them to scrape the seeds out and to have a door for the future tenets. Then he hangs the gourds up and spray paints them with an outdoor clear paint.
They're just the coolest things! The birds are really enjoying them.

Downstairs Cat is, of course, fascinated with this whole bird nest / bird activity process! From nest building by Farmer Lynn, and nest building by birds just outside his door and window. Spring brought new wonder to this curious little fellow...

Another of these is over in eastern NC at my daughter's (blogger TallGirl) house now -- I'll be going there soon and will check on any occupants!

Farmer Lynn hung up several of the bird houses around the north and east sides of the house. They look nice and blend in with the natural area there. They get lots of welcome visitors. But the one that got the
the most interest was a bird so inspired by the gourd house design, it didn't wait for completion before it chose its gourd. A cracked gourd on the table Farmer Lynn was doing his gourd thing on. A wren built a nest and three baby birds was hatched, fed, raised, and flew from that gourd and it stayed on the table (much to the delight and interest of Downstairs Cat, whose window onto the baby birds is on the upper left of this picture!) Farmer Lynn didn't want to tear up the nest or move it when he spotted it, so he "worked around" it until the family was out...


Subscribe to:
Posts (Atom)