Saturday, December 22, 2012

Ready for Christmas


We decorated inside and out a lot more this year.  At the Winston condo, I put cranberry garlands on the two chandeliers.  I love the way those look.  A simple wreath went onto the front and the nutcracker cross-stitch in the foyer..


I put a blue nutcracker on the table underneath the framed cross-stitch flanked by red candles.  I usually put white netting lights on the backyard shrubs but didn't this year -- just didn't feel like it.   The tree is a fake ficus with the angels on it.  I think it turned out really sweet.  It has the clear ornaments with just a few pink ones. And I got out the Christmas pillows of course.


And one day, my sister's grandchildren decorated a gingerbread house.  I think they did a great job. A great holiday already at the condo this year.


Then at the Yadkin house, in addition to the yard barn decorations in an earlier post (I do love those!), we strung garlands and bows on the front porch railing --


Farmer Lynn spotted a Facebook posting of a tire used as a wreath (I'm sorry, I couldn't re-find that picture or who to give the credit) but it inspired him to make his own tire wreath to add to the front: He added so much holly and berries that you can't see the tire foundation unless you sneak up on it sideways.


The living room tree was a small one on a table this year, shown here with the backdrop of a family quilt. The animal ornaments went on that tree..


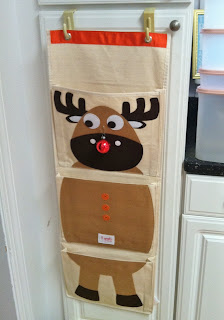
The nutcracker table runner displayed upright this year on one of the dining room doors, as did a Rudolph reindeer hanger in the kitchen (he has a red ornament for his nose).


Two of the Christmas cacti that bloom at Easter, Halloween, Thanksgiving, and hardly ever at Christmas decided to bloom "on time" this year.  So I got them together and put them on the corner heater.


Then the screen porch did not look very festive at all, having just the lone poinsettia wreath on the door.  


So Mr & Mrs Rudolph came out and are relaxing in the swing --  


I certainly hope they enjoy their time on the screen porch swing.


The best decoration of all, though, was a collaboration between Farmer Lynn and Mother Nature.  He had wound several light strings around one of the evergreens in the front, but couldn't come up with a topping that he liked.  As he went out to look at it all again, the moon came into perfect position over the top of the tree and Farmer Lynn snapped this picture.  I think it's just beautiful and makes me so happy we spent this year setting up and feeling at home at the Yadkin Yard.  


Tuesday, December 18, 2012

Yadkin Yard Workday

Today was a busy day in the Yadkin Yard.  The yard barn is now decorated -- 


The two silver stars are safe and sound!  They're just hanging out in the barn until the end of these holidays, then they'll go back up, and the red ones will take the back seat.


The concrete walkway/sidewalk within the "dog lot" had seen better days.  In several places, the concrete was just crumbling away from the rest of the walkway.


Today was a beautiful day, clear skies and temperature in the 70's!  So Farmer Lynn's son came and repaired the concrete walkway.  It looks great now.  That's a beautiful area anyway because it has several birdfeeders in there and some pretty rose bushes.  Farmer Lynn planted golden mums and shasta daisies from the south border garden at my mother's house.  They're doing really well.  This year was an adjustment year for them.  They did bloom, but not like they normally do.  I am confident they will put on a display next year, however.  


Beautiful job, eh?


Then then they cleaned the gutters.  Up on the roof they went!  While they were up there, they measured the opening and length of the chimney flue liner that we'll need.


and took the truck and got a load of mulch for around the trees in the south yard.  Now that the neighbor's yard fowl don't venture over here anymore (hallelujah!), we can go back to working on that yard.  They also fixed the lawn mower cart/trailer, replaced the rubber seals at the bottom of some of the sunroom windows and one living room window where the seals had come loose so that the windows weren't sealing shut.  All in all, a very productive Yadkin Yard Workday!

Monday, November 26, 2012

Kitchen Curtain -- Burlap Valance

This is a project we did over the Thanksgiving weekend.

We decided that the kitchen window needed some color, some softening, some fabric!  So my sister, the family seamstress, went to Hancock's and brought back 4 fabric samples -- a tan burlap, a red burlap, and 2 red&black plaids.  I hung them up on the window molding with push pins to see what looked best.  Here's the window with no curtain but with the 4 sample fabrics:


We liked all four samples which didn't help the decision-making! I was leaning towards one of the red ones but then decided that had something to do with the upcoming Christmas decorating!  We finally settled on the natural-color burlap because it befitted a house in the country, because decorating with burlap is all over Pinterest (!!), because the black countertop has little flecks of tan in it, and because it reminded Farmer Lynn of being younger and part of a farming community.


If you'll notice, the ends are already sewn through and have a finished edge.  That helps a lot with the sewing part of the project. My sister was able to use that to her advantage.  The width of the window opening is 67" and the width of the burlap is 47" so she sewed two 24" pieces together for the width, which made for sides that did not need to be hemmed because they are already finished.

The window frame is between the upper cabinets on that side of the room.  So rather than screw a curtain rod into the wood, I got a tension rod that would be long enough to fit that gap and we fed the valance through the tension rod.

Trial-hanging the tension rod without the valance had been simple!  However, once the burlap valance was hanging from it, that was a different story.  I got it hanging this far up --


but was afraid to go any higher without a 2nd person because it had to go exactly in the right area between the window wall and the lights, and because if it had fallen (which would have been very likely in the case of me doing it all by myself), it would have hurt plants and glass in the sink counter area.  So the project paused for several hours.  Then Farmer Lynn got freed up to help and we got it hung up the rest of the way.  (Notice the sample piece of burlap fabric still hanging up, hehe -- we noticed it in time to get it down before the valance covered it up.)  Isn't this pretty?  There's a little bit of fabric above the rod to make a nice cheerful look, then the rod pocket, then the rest of the valance hemmed at the bottom.  Alternatively, you could let that bottom edge be fringed.


I'm very pleased with the way it turned out.  The burlap carries an authenticity to it as part of the Yadkin Yard community and its past.  The color picks up the light wood floors, the specks in the countertop, and some of the dining room furniture.  And I just plain ole like it -- so there!  Many thanks to my seamstress sister for making this for us.

Burlap sacks were once a familiar sight for farmers and shoppers.  Today, thanks to the popularity of plastic bags, it's almost possible to go your whole life without seeing one.

Farmer Lynn remembers using and reusing burlap sacks on the farm when he was growing up. Using burlap in the Yadkin Yard house seemed appropriate to him therefore.

Burlap is a coarse material woven from jute or hemp. Burlap sacks were once used to store and transport vegetables, flour, livestock feed, and other goods. Today, they are still often used to store large quantities of coffee and rice.

Commonly called burlap in the United States, it is known as "hessian" in parts of Europe because it was used in the uniform of soldiers from the state of Hesse. A bag made from the material is called a "gunny sack" in some places. And, of course, burlap is the rough material that makes up the bags used by children in potato sack races. It's also sometimes blended with other fibers to make yarn, rope, cordage, nets and other similar products.

It originates from India where it was used as backing on rugs and linoleum.  India produces most of the jute that is spun into burlap. The two main sources of jute are C. capsularis and C. olitorius, which are grown in the Ganges and Brahmaputra valleys. The plant has only been known to Western trade since the 1800s.

Burlap's distinct smell is from linseed oil used in the weaving process, to make it run through the looms, otherwise the coarse plant material tears and gets caught in the looms.  It's itchy to sew with but fortunately this particular project did not require much sewing.

Tuesday, November 20, 2012

Pineapple Plant -- Six of them now!

OK, so when we last left this saga, lol, about growing pineapple plants, I had cut the top off the second of the "next generation" pineapples and put it in water to root.  It did root.  Here you can see how the roots look after just a couple of weeks.  I changed the water twice, and one of those times I pulled out some pineapple fruit from around the little roots.  Otherwise I really just left it alone.  


Once the roots looked viable, I planted the little plant in some soil and it's now set to grow indoors over the winter.  The two new plants will probably not bear fruit next year; they'll probably wait until the following summer to do that.  In the meantime, it's a nice plant I think.  So theoretically the original two pineapples are now six plants.  The original two are still alive.  The two babies that have grown up in and around those original pineapples will need to be divided off eventually.  And then these two new baby plants grown from the original pineapple plants' pineapple fruit.  Try it out!

Monday, October 22, 2012

Fall Decorations -- Wind Chime

Farmer Lynn got creative with spray paint the other day.  We had a rusty-but-solid metal wind chime on the corner of the house.  He decided that it deserved some sprucing up.  So after sanding away the rust and old paint, he spray painted it a flat black indoor/outdoor Krylon paint, and let that dry real thoroughly.  Then he put a leaf here, a leaf there, and did a real soft overspray with Rustoleum's similar spray paint in Heirloom White.  He let each side dry really well before doing the next side.  Only one side had a small run, probably just a tad too much paint on that one.  But now the wind chime is hanging back up in its corner spot.  Removing the rust and painting it with rust-resistant exterior paint should really add to its lifespan.  I think it looks splendid.


Just a short posting today to show you how pretty the wind chime came out.  Another fall decoration for the Yadkin Yard! 

Thursday, October 18, 2012

Fall Decorations -- Halloween pillows

My sister made me and my daughter Halloween pillows.  I think they turned out really adorable, er, um, I mean, scary .....


An orange shiny fabric with black spiderwebs!


A black fabric with eyes watching us!  Piped in orange.


And a green fabric with black witch hats, white skeleton heads, black spiders, pumpkins, and BOO!!


And here's a photo of them all haunting our living room sofa.  Yikes!  And BOO!!   Didn't she do a great job?


I believe that she got the fabrics and also the pillow forms at Hancock's Fabrics

Tuesday, October 2, 2012

Pineapple Plants Update -- The Next Generation

The last posting on the pineapple plants was July 4's (see updates-on-pineapple-plant-pallet.html).   They were out on the front porch, basking in the sun, each making a pineapple fruit.


Since then, we cut off the biggest one's fruit and ate it, cutting off the top greenery of that to make a new pineapple plant. I like that new plant.  Here it is in dirt, growing inside until next Spring.  It has already grown quite a bit.  I think they're such pretty plants.

We didn't remember to take any pictures of that operation, so today when we cut into the smaller pineapple and cut off its top, we took pictures.


Take the top piece and put it into some water so that the roots for it (which you'll be able to see up in there already -- little white slivers) can grow enough to support the plant in some dirt. It won't take long for this to happen.  Keep a watch every few days that you still have enough water in the cup, that the water isn't all dirty, and to remove any fruit that separates down from the roots.  Enjoy your homegrown pineapple fruit!

Once the roots look pretty substantial, you can put the plant in dirt.  It's an ouch-ouch operation because that greenery is very sharp and prickly.. Be careful.


In the meantime, on the original plants, each is creating a "pup".  We have read that the original plants, being a type of bromeliad,  will die now that they've created the fruit and now the pups.  I hope not, but we'll soon see how that works.

Here's the "pup" growing up at the bottom of the largest plant.  It's a good size now already, so Farmer Lynn will probably be putting it in its own pot real soon, another ouch-ouch operation.


 And here's the pup we discovered just yesterday growing up within the other plant.  I was glad to find it because we hadn't seen any signs of that one making a pup whereas the main plant is getting more and more yellow and floppy.  The pup will have to grow quite a bit more before we'll be able to figure out how to separate it successfully from the main plant!

Do try this yourself.  It's a lot of fun -- if you're a plant person.  Or a pineapple fruit lover.  It's not difficult, just takes patience as it takes its time maturing.


Tuesday, September 25, 2012

Fall Decorations From The Yadkin Yard

Today was a fun day in the Yadkin Yard.  Farmer Lynn pulled up the dead corn stalks from the garden in preparation for putting the garden "to bed" for the winter.  His younger son was here so they took a tomato cage, turned it upside down, and attached the corn stalks to the tomato cage.  It then went onto the front porch along with straw bales and a pumpkin.

An orange and black plaid ribbon on the rocker and around the corn stalks finished it off.  I like the result very much.

Saturday, August 18, 2012

Feng Shui, Bagua Map, and Inspiring Sayings

aka feng shui


Since I'm still recovering from 2008's multiple fractures and 2011's cancer, and now have "primary hyperparathyroidism" (don't know much about it yet) to deal with and get over, I have become interested in the principles of Feng Shui to help with healing in particular and energy in general.  My bedroom in Winston is now painted a soothing Sherwin-Williams Creme and the bed is in soft pinks.  I have always felt peace at the condo so I am not concerned about Feng Shui there.  But the Yadkin house and yard, although also feeling very peaceful and soul-soothing to me, will be going through the Feng Shui process, beginning with the house.

Mary Lea Bradford, www.havenscapes.com, is going to be involved in the yard "work" but I'm not ready to tackle that yet.  I hope to make use of Louise Klein's help, www.windandwaterdesign.com, with the inside.  Until I can free up some funds for those wise women, I'm on a strictly DIY path with something I know nothing about!  That's never stopped me before, and it's not stopping me now.  So I read that clutter is definitely bad Feng Shui, bad energy.

So I've been on a campaign to de-clutter.  This is no easy task.  Hahaha.  I am good at clutter, making it, that is.  Not anywhere near hoarder status, but a nice medium-size clutter maker.  It is hard for me to throw things away.  Fortunately Farmer Lynn does not coexist well with clutter and so he helps me with this "tendency".  It does help that we are still moving this into this house and into place in this house, so as I look at items, I can think "ok, trash" or "ok, Goodwill" or "ok, freecycle this".  I can also group like things together and realize when I have more than plenty and can do the trash/Goodwill/freecycle processing.  Nowadays I hear that de-cluttering is called "space editing".  Doesn't that sound much nicer?

The second thing I've done is to look up Feng Shui and discover Bagua Mapping.  I had never heard of this before.  It has taken over my arranging of things.
bagua map

There are roughly nine rooms in the Yadkin house and there are nine different Bagua Map parts, so figuring out what goes where, according to the Bagua Map, is easy.  I can do what I can do, and then let those who know more about this rearrange things later!  At least I ought to be in the general neighborhood, I figure (she says confidently).

I find myself wanting to put lots of blues pretty much everywhere.  A completely blue house would feel healing and peaceful to me.  I have decided to go with that feeling, since it's so strong, and still put lots of blues around the house since it comforts me (and since it's my favorite color and Farmer Lynn's favorite color too).  But I have been surprised at the nice effect that the other colors, the Bagua colorings, have on me as well.  So this will take up some time in the short- and medium-range.

One of the first things we did when we moved in was to get together sayings that we liked.  Bible verses.  Love sayings.  Inspirational words.  I really like the work of Mary Anne Radmacher, www.maryanneradmacher.net.  She has beautiful drawings to go with her quotes.

I already had a few of hers framed and then I ordered a few more earlier this spring.  So we hung those up as we found the right place for them.  Recently I discovered Craft Cuts, www.craftcuts.com, that has vinyl lettering sayings that you can put right onto your wall -- no framing or nail holes.


I like quite a few of those, haha.  There is a lot of beadboard here so I will have to find just the right spot for at least 2-3.   You can also use their wooden letters to spell out whatever you want (see http://www.thehappierhomemaker.com/2012/08/family-room-accent-wall-with-a-giveaway.html#comment-853)  but I'd have to really give that some thought.  Those don't come easy for me.  I really like hers though.  While you're checking that out, join the raffle there.  You could get a $30 gift certificate to Craft Cuts.  If I won that, I'd check out their vinyl chalkboards and wall murals (for the man cave!) also.  Otherwise, I'll have to wait a while to go any further.

The Man Cave, by the way, on the Bagua Map is in the "career" spot.  I'll have to read up on that more to see how that relates to what goes on in a man cave!

The Yadkin Yard is a Good Garden Yard -- Part 2

The Speckled Swan gourds took off, went crazy, or as my grandma used to say "went down yonder"!!  Farmer Lynn had to check on the vines about twice a day to keep them from trying to grab onto things they shouldn't.  They're all across the back, up the supports for the sunroom and the screened porch, up and across a maple tree -- they're everywhere.  I'm looking forward to to fixing them up for the birds to nest in.  Maybe some Purple Martins will come stay with us!

    They're all across the back, up the supports for the sunroom and the screened porch, up and acrossa maple tree -- they're everywhere.  I'm looking forward to to fixing them up for the birds to nest in.  Maybe some Purple Martins will come stay with us!


The other bumper crop this year was sunflowers.  Farmer Lynn planted the seeds in the garden originally, but soon afterwards we had a huge flooding rain that moved around a lot of the freshly-planted garden seeds.  A lot of the sunflowers ended up (downhill of course) in the reforesting area.  They're hard to get to down there for us, but the birds will enjoy them.  We do need to reach a few in order to save seeds for next year.


Here's the garden now.  We have plenty of watermelons that will be ready soon.  We both love watermelons and so do our families, so we're very pleased at how well they're turning out.  

The corn just didn't get enough water this year and the soil was so hard.  It was still tasty though.  These marigolds are from seeds that Farmer Lynn has planted, saved seeds, planted, saved seeds, for 18 years now.  They're a very pretty color and add nice bunches of color to the garden and that whole side yard actually.  


The Yadkin Yard is a Good Garden Yard.